Your Guide to Squarespace Courses: How to Increase Your Revenue on Autopilot
Did you know Squarespace just launched a product that will definitely make your life easier? While Squarespace has always been known for its user-friendly platform, they dropped the ultimate game changer: Squarespace Courses & Digital Products.
You can now build and create courses from your Squarespace account and offer everything your audience needs from one platform. Finally!
So, whether you're a new business owner dying to launch a digital product or you’re a seasoned entrepreneur with several courses on the rise, this new product will be your secret weapon to up-leveling your business.
But if technology isn’t your thing, we’ve got your back. In this article, you’ll learn everything you need to know to learn how to sell your digital products on Squarespace Courses, so you can start selling courses, advertising your products, and increasing your monthly revenue. Let’s dive in.
What Are Squarespace Courses & Digital Products and Why Are They a Must?
You might be scratching your head, wondering what the buzz is all about. Well, on August 21, 2023, Squarespace unveiled its shiny new digital product suite, expanding upon Squarespace Member Areas. This suite now includes three distinct products, providing a solution for just about everyone:
Squarespace Member Sites: If you’re already familiar with Squarespace, this new product is a revamped version of the initial offering.
Squarespace Video Pages: Imagine a platform where you can sell a group of videos to your audience. Perfect for anyone who needs to create and teach multiple concepts. (Think on-demand yoga classes, etc.)
Squarespace Courses: Lastly, the most exciting of all three is your chance to create the ideal course using a mix of elements like videos, images, PDFs, workbooks, etc.
So, why would you want the brand-new Squarespace Courses & Digital Products? It's no surprise that Squarespace has always been great at delivering products that meet the needs of its users. But now, their interface has expanded, and you can reap the benefits of gold-standard platforms like Kajabi, Thinkific, or Teachable within a more budget-friendly and less technologically intimidating format. By maintaining its “Website-building made easy” mission statement, you can create a course with modules, lessons, and every aspect perfect for selling your expertise into bite-size digestible content.
Not only can you organize and build everything you need from your Squarespace account (Gotta love the under-one-roof approach), but your audience will love how easy it will be to navigate your course while receiving the solution you offer.
It’s a win-win for everyone.
How to Create Your First Squarespace Course
Now that we’ve outlined the benefits, let’s create your course (Given you already have a Squarespace membership, of course. If not, start your Squarespace journey with a free trial and explore your options). And if you’re still struggling to create your website, not to fear. We offer several Squarespace website templates to ensure your website lives up to your potential.
Heads up: Squarespace Courses are only available to users on the newest 7.1 version. Unfortunately, if you’re using an older version, you’ll need to upgrade to gain access.
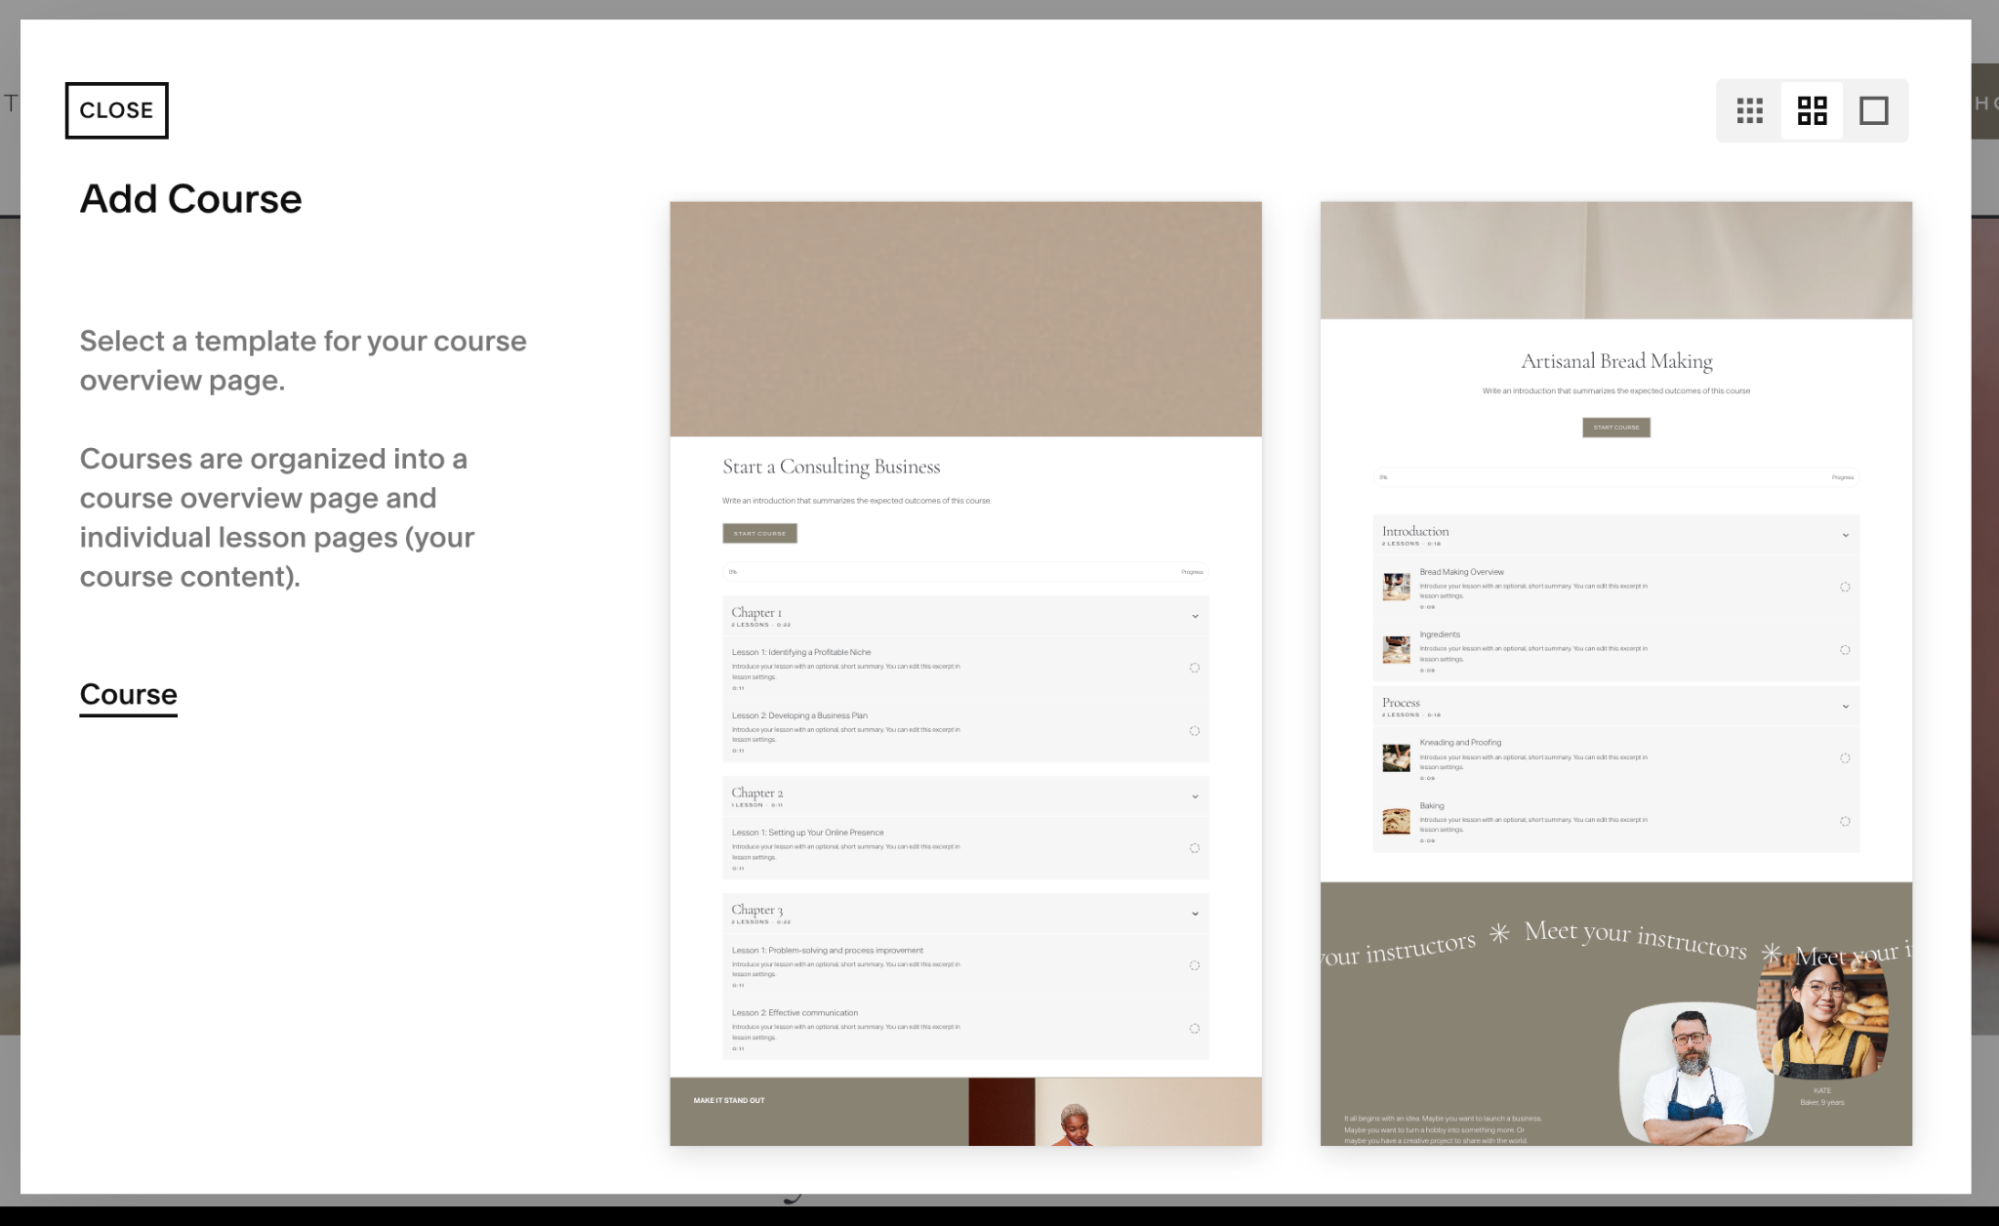
1. Go to your website tab and click “Courses - New” in the not-linked section.
2. Next, you will have the option to choose from two demo course layout options. However, it doesn’t matter which one you select, as you can always customize your course as you create it.
3. Ta-da! Now your course is available in your unlinked pages, and the real fun can begin.
How to Add Content and Make Your Squarespace Course On-Brand
After selecting a layout option, you’ll have the opportunity to build the heart of your course: The content! Below, we’ll show you how to take your audience on a journey of organized chapters, lessons, and modules in a logical format.
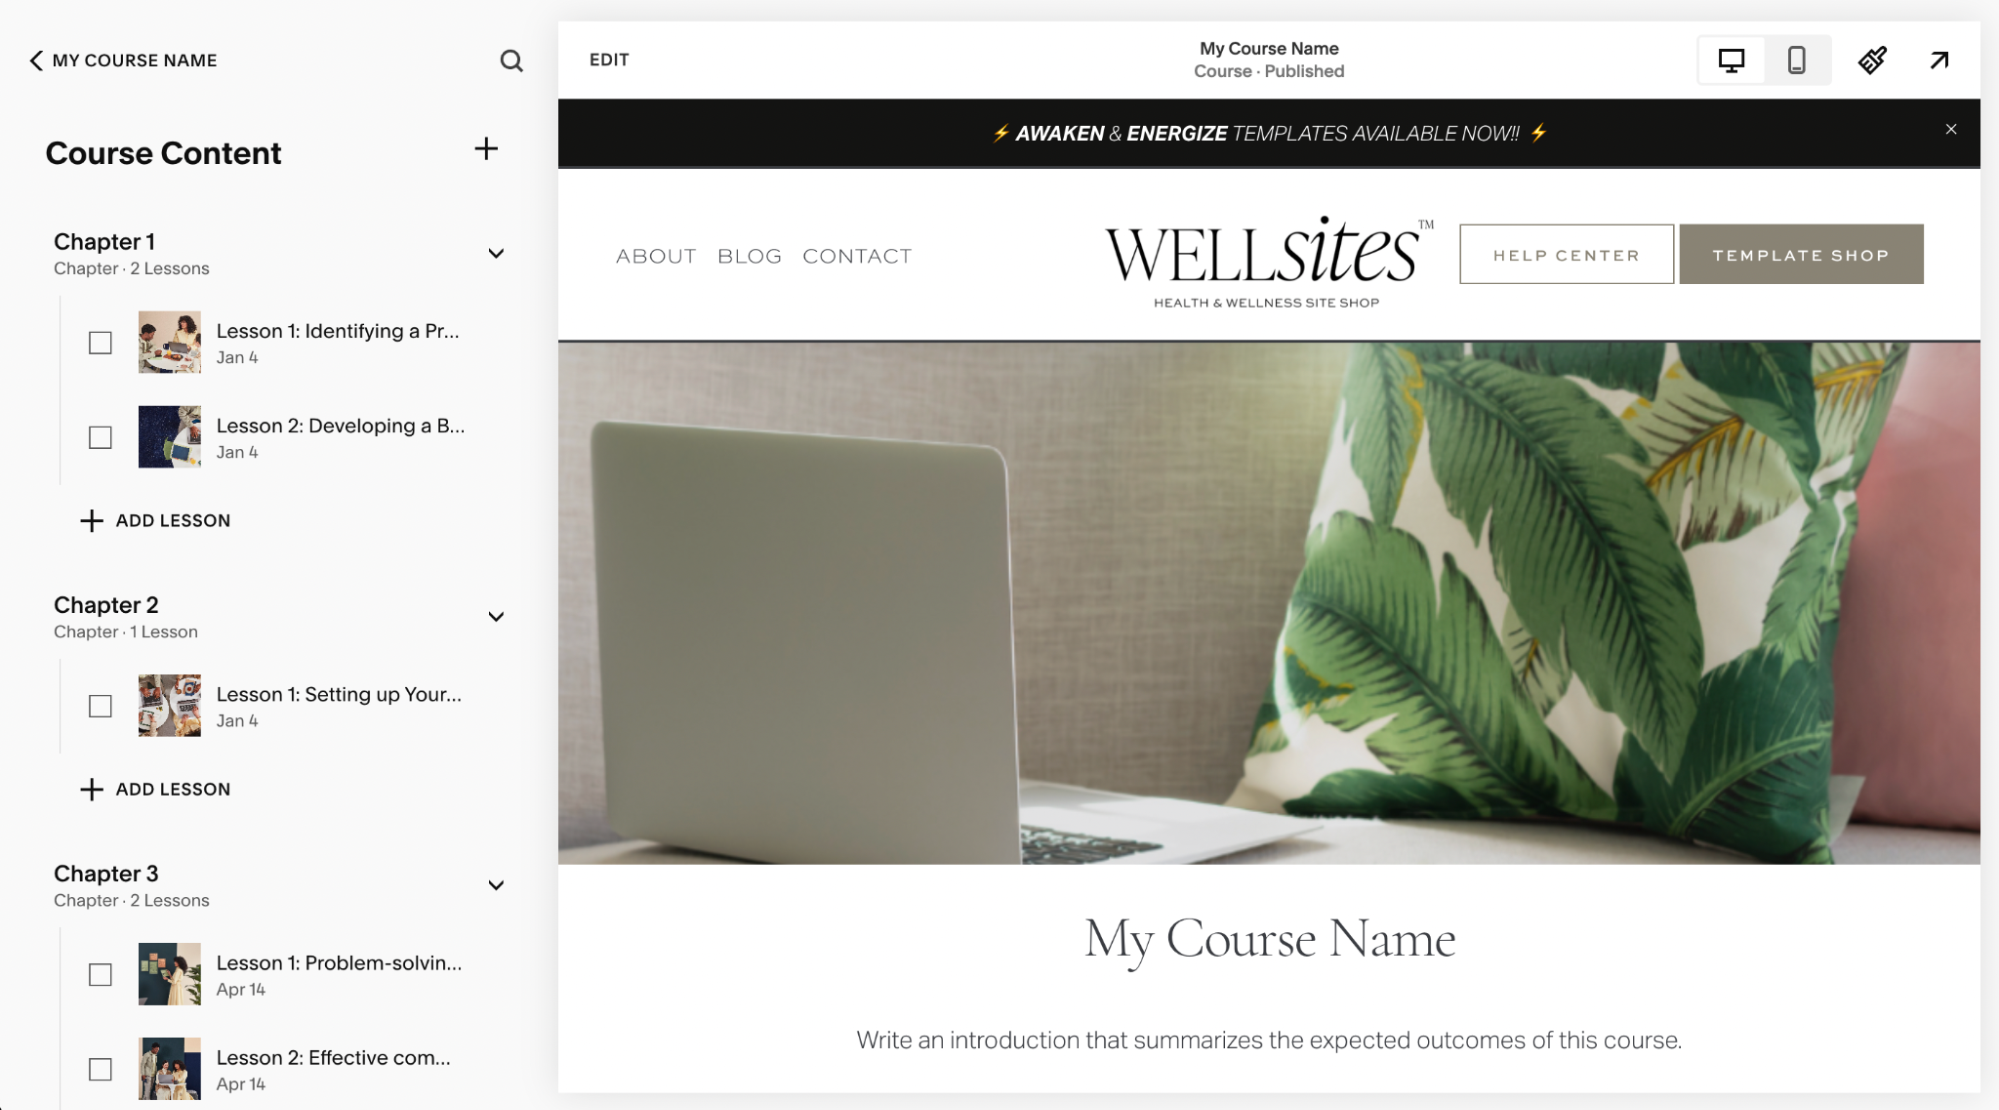
1. Click on your course to open the editor and select “Course Content”.
2. Next, you’ll find quite a few example demos to help you brainstorm and receive inspiration. Browse through the demos, but be careful as you explore. If you “delete it out” (referring to a chapter), it will also delete all the lessons within that chapter.
3. If you don’t like the sample content they offer, delete it until you receive “No content” and start building your course one lesson at a time.
4. When adding your content, you’ll build chapters and lessons. Like a book, chapters are your headings, and your lessons represent several topics within each chapter. We recommend creating your chapters first to follow a more structured format. Click "Add a chapter" and give it a title.
Heads up: Titles for both chapters and lessons must be 200 characters or fewer.
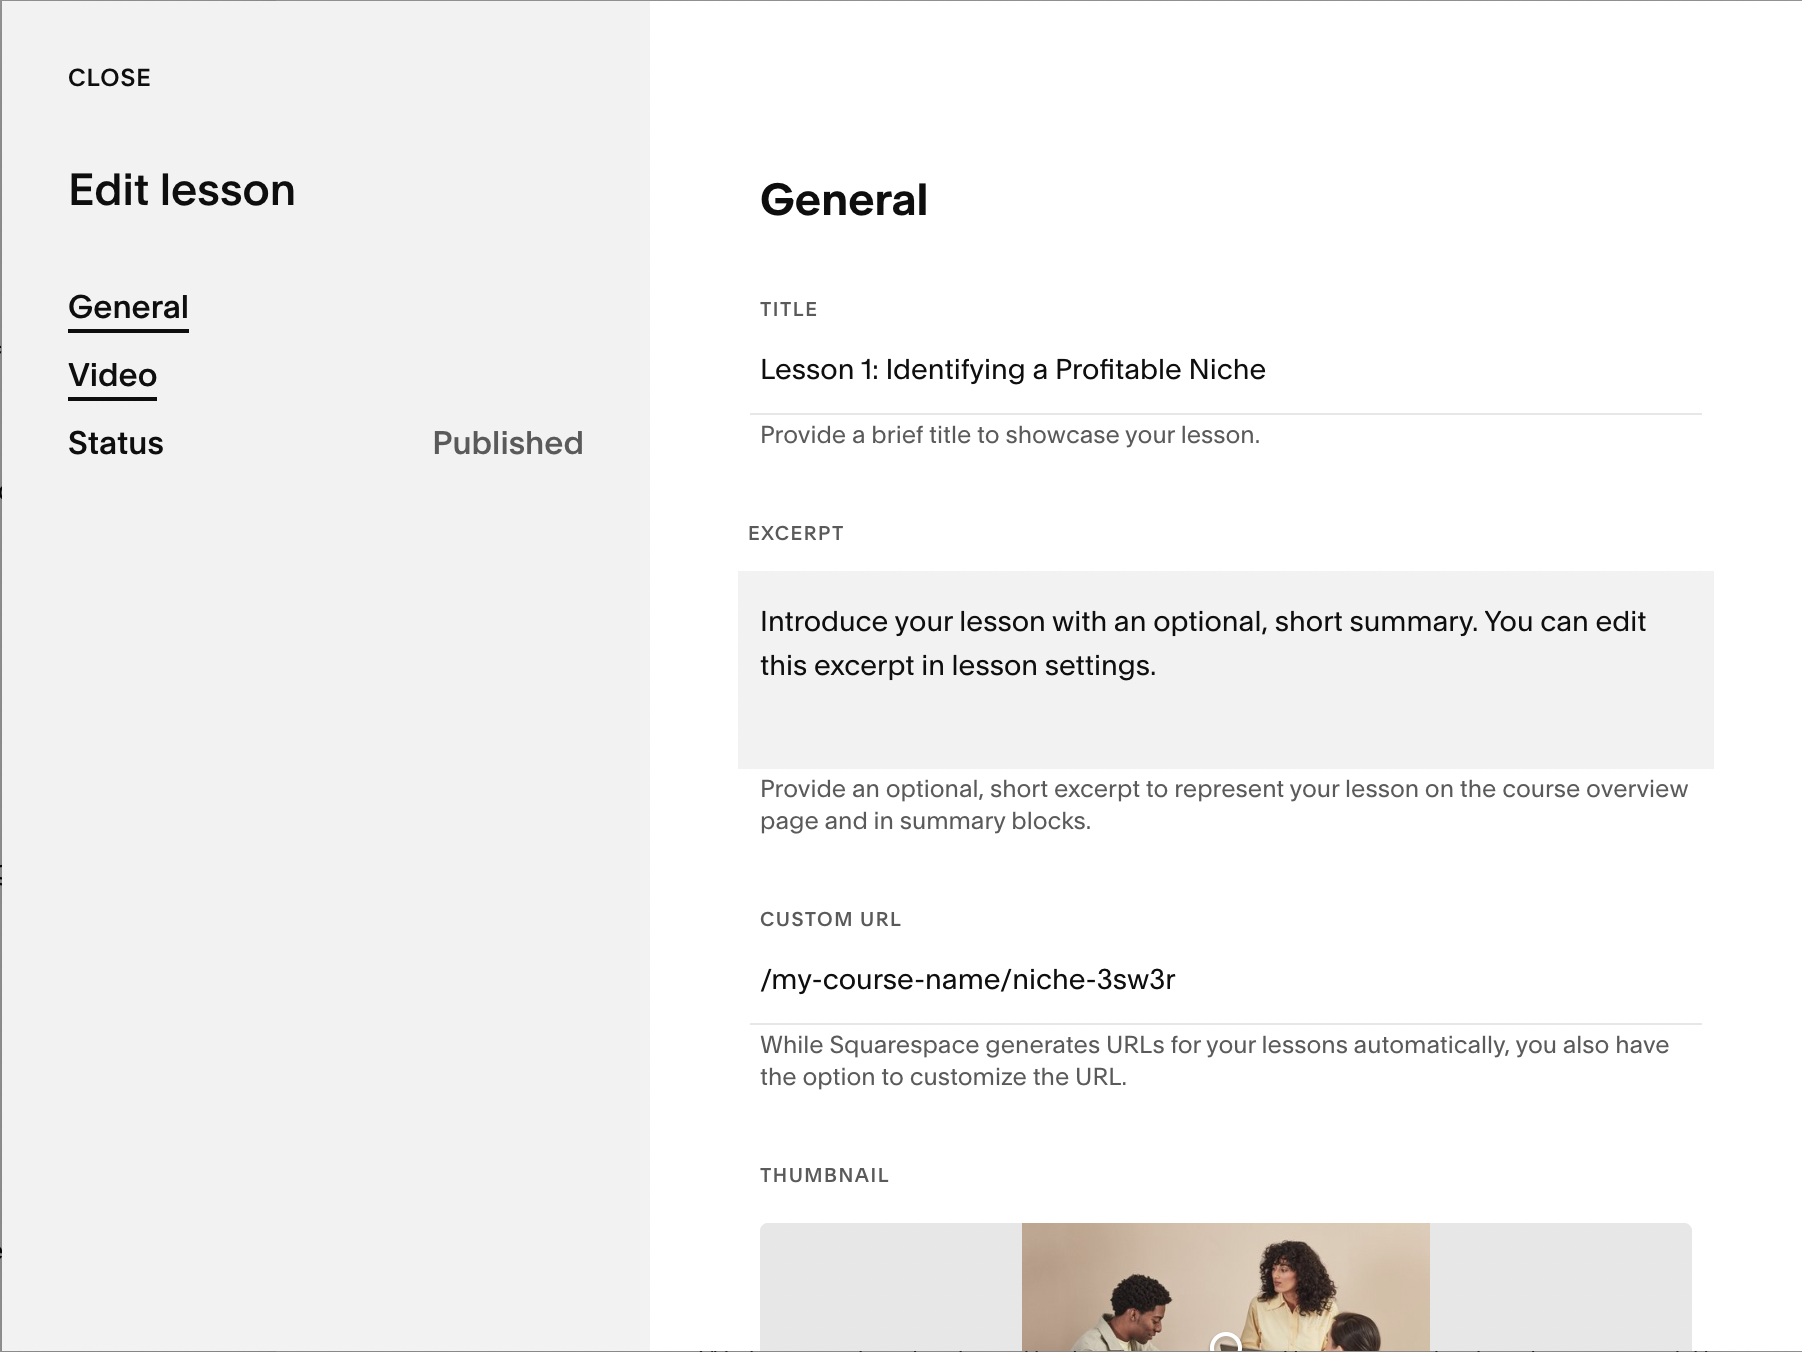
5. Now, let’s add your lessons. Within each chapter, click “Add lesson” and give it a title. Next, create an engaging excerpt that will make site visitors want to learn more. We also recommend customizing your URL slug to make it SEO-friendly. Lastly, upload a thumbnail that will be featured on the course overview page and course navigation pages.
6. Next, set the status of your lessons. You can choose between draft, published, or scheduled options. This feature allows you to continue following the aforementioned steps to create several lessons in one go and save them until you’re ready to publish. You can also use the calendar to schedule your lessons in advance. The scheduling feature is helpful if your course is designed to “drip” content at regularly scheduled intervals.
7. Before we start learning how to add videos and other content, click on each lesson and edit it to review design options including section dividers, padding, button types, fonts, and colors.
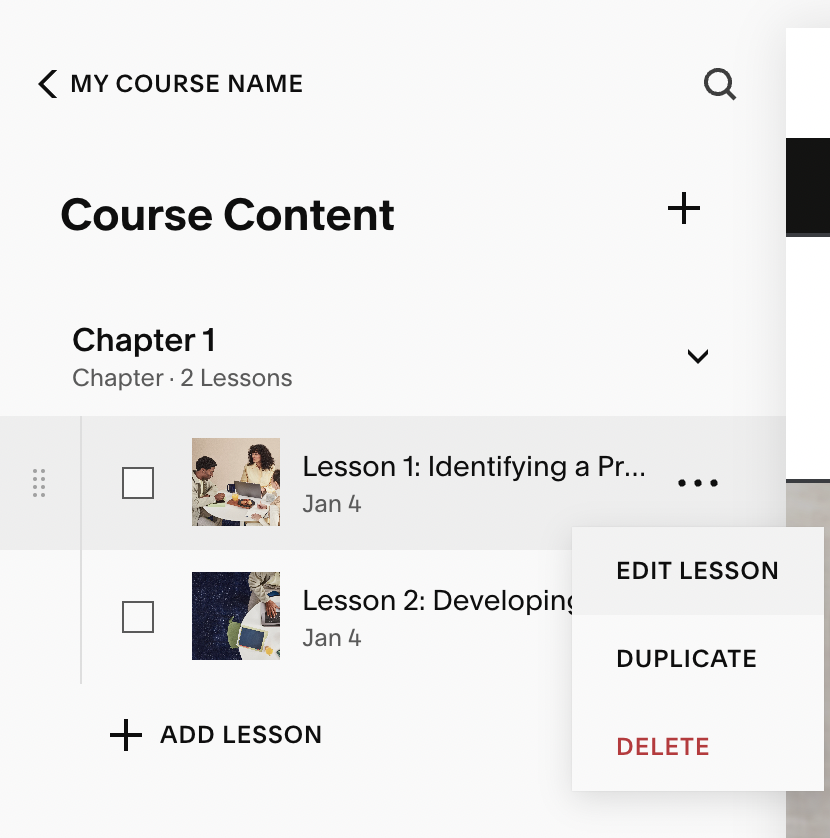
8. Time-saving tip: Once you have one lesson perfectly designed, you can click on the 3 dots to the left of the lesson and select “Duplicate”. This command will allow you to easily replicate that lesson’s design throughout your course to save hours of time.
9. Are you worried your lesson is in the wrong place? It's okay. Squarespace has made the course, like the rest of its interface, drag-and-drop friendly to showcase your creativity without the stress. So, simply drag and drop your lesson to reflect the desired order.
How to Create Content for Your Squarespace Course Lessons and Create Your Squarespace Course Overview Page
Your course wouldn’t contain the “it-factor” if it didn’t include videos. So, let’s learn how to add them to make your digital product irresistible to your audience.
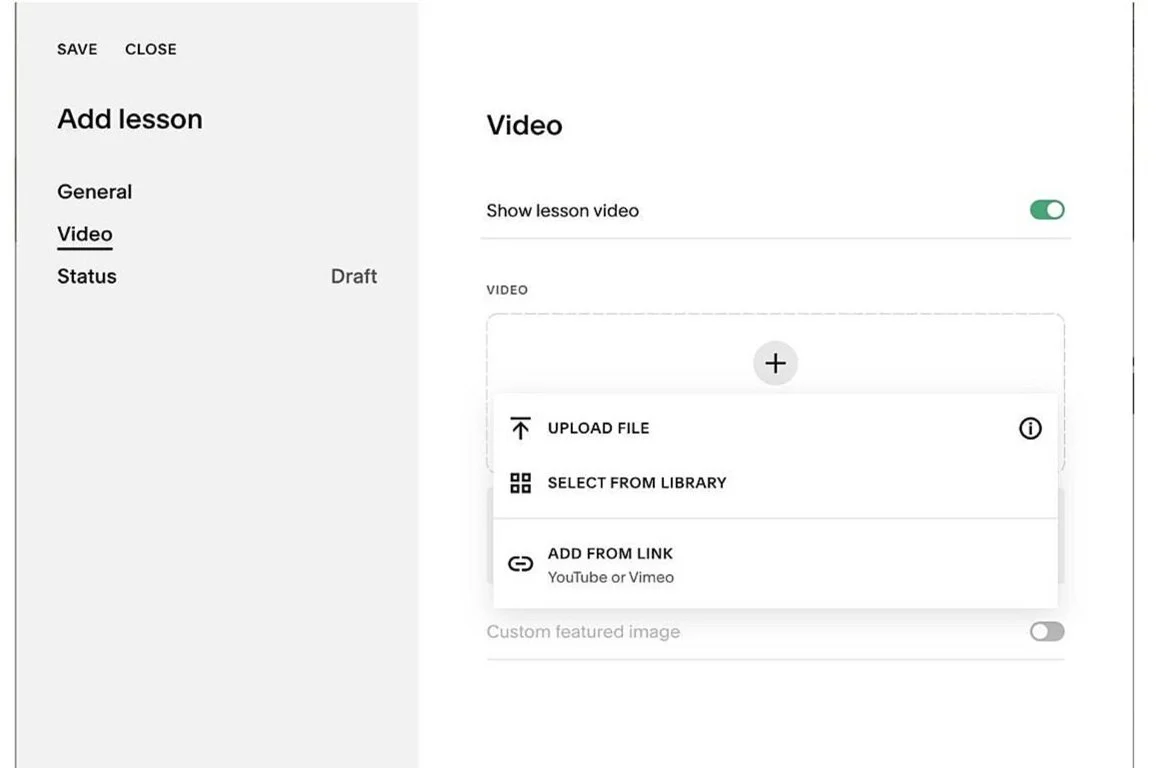
1. Click to “Edit Lesson” and then click “Video”. However, if you don’t have a video to upload, that’s okay. Simply toggle “Show lesson video” on or off as needed.
2. If you have a video, select “Replace”, and you'll see three options. You can either upload a file, select a video from your computer’s library, or add a link from another source.
Heads up: Any video added to the “Lesson page’s video tab” can be up to three hours long. Yet, if you upload your videos natively to Squarespace (A big selling point), your videos will be beautiful without the YouTube overlay or technical issue of linking. However, storage capacity depends on your billing plan. Every Squarespace Courses membership allows at least 30 minutes of video storage.
3. Next, you’ll see “Custom featured image”. You can upload a customized thumbnail to feature with your video.
4. Similar to the lessons, once you add a video, you'll be required to assign a status. If you’re ready to publish it so it’s live, change the status from “Draft” to “Published”, or you can schedule a date for it to be published at a later time.
5. Need more content? Click on the edit button in the top left and add a section. You can click “Add block" to provide the same options you can find everywhere else in the Squarespace editor. For example, you can add text blocks, image blocks, video blocks, newsletter blocks, accordion blocks, etc.
Pro tip: Take advantage of the Squarespace New Fluid Engine Editor to add design elements to strengthen your course, like videos, text, PDFs, pictures, buttons, and more (keep reading for a few examples).
6. Lastly, don't forget to build your “Course Overview Page” to make it fully on brand. Click “Edit” in the top left-hand corner to review the chapters/lessons you’ve created thus far. Your course overview page will feature the course description, a progress bar, a “start course” button, and your content. Click “Edit Layout” in the top right corner of this page to continue adding, refining, and customizing to ensure your course aligns with your vision. You can even add additional sections below to help promote your course, including a FAQ or an instructor bio.
How to Determine and Add Pricing for Your Squarespace Course
Next, you’ll need to determine the price point for your course. Factors to consider include your expertise, past results, and the value of what you’re delivering to your audience.
Heads up: A pricing plan is required. If you forgo this part of your course journey, your course will be public, and anyone and everyone can sign up. So, at the bare minimum, select the free option discussed below to safeguard your knowledge and expand your email list.
1. When you’re ready, click “Pricing Plans”. You will see options to fill in the name, description, and benefits of your course.
2. Next, you’ll scroll down and find three payment options that offer your students indefinite access to your course:
Subscriptions. As the name suggests, your audience can pay a weekly, monthly, or yearly membership fee to maintain access to your course.
Fixed amounts. You can offer your students the option to “Pay in full” or payment plans to split up the costs for the course period in monthly installments.
Free. After creating an account, your audience will gain access to your course, but won’t be required to pay anything.
Heads up: Both the subscription and fixed amount pricing structures allow you to offer up to two pricing plans for your students.
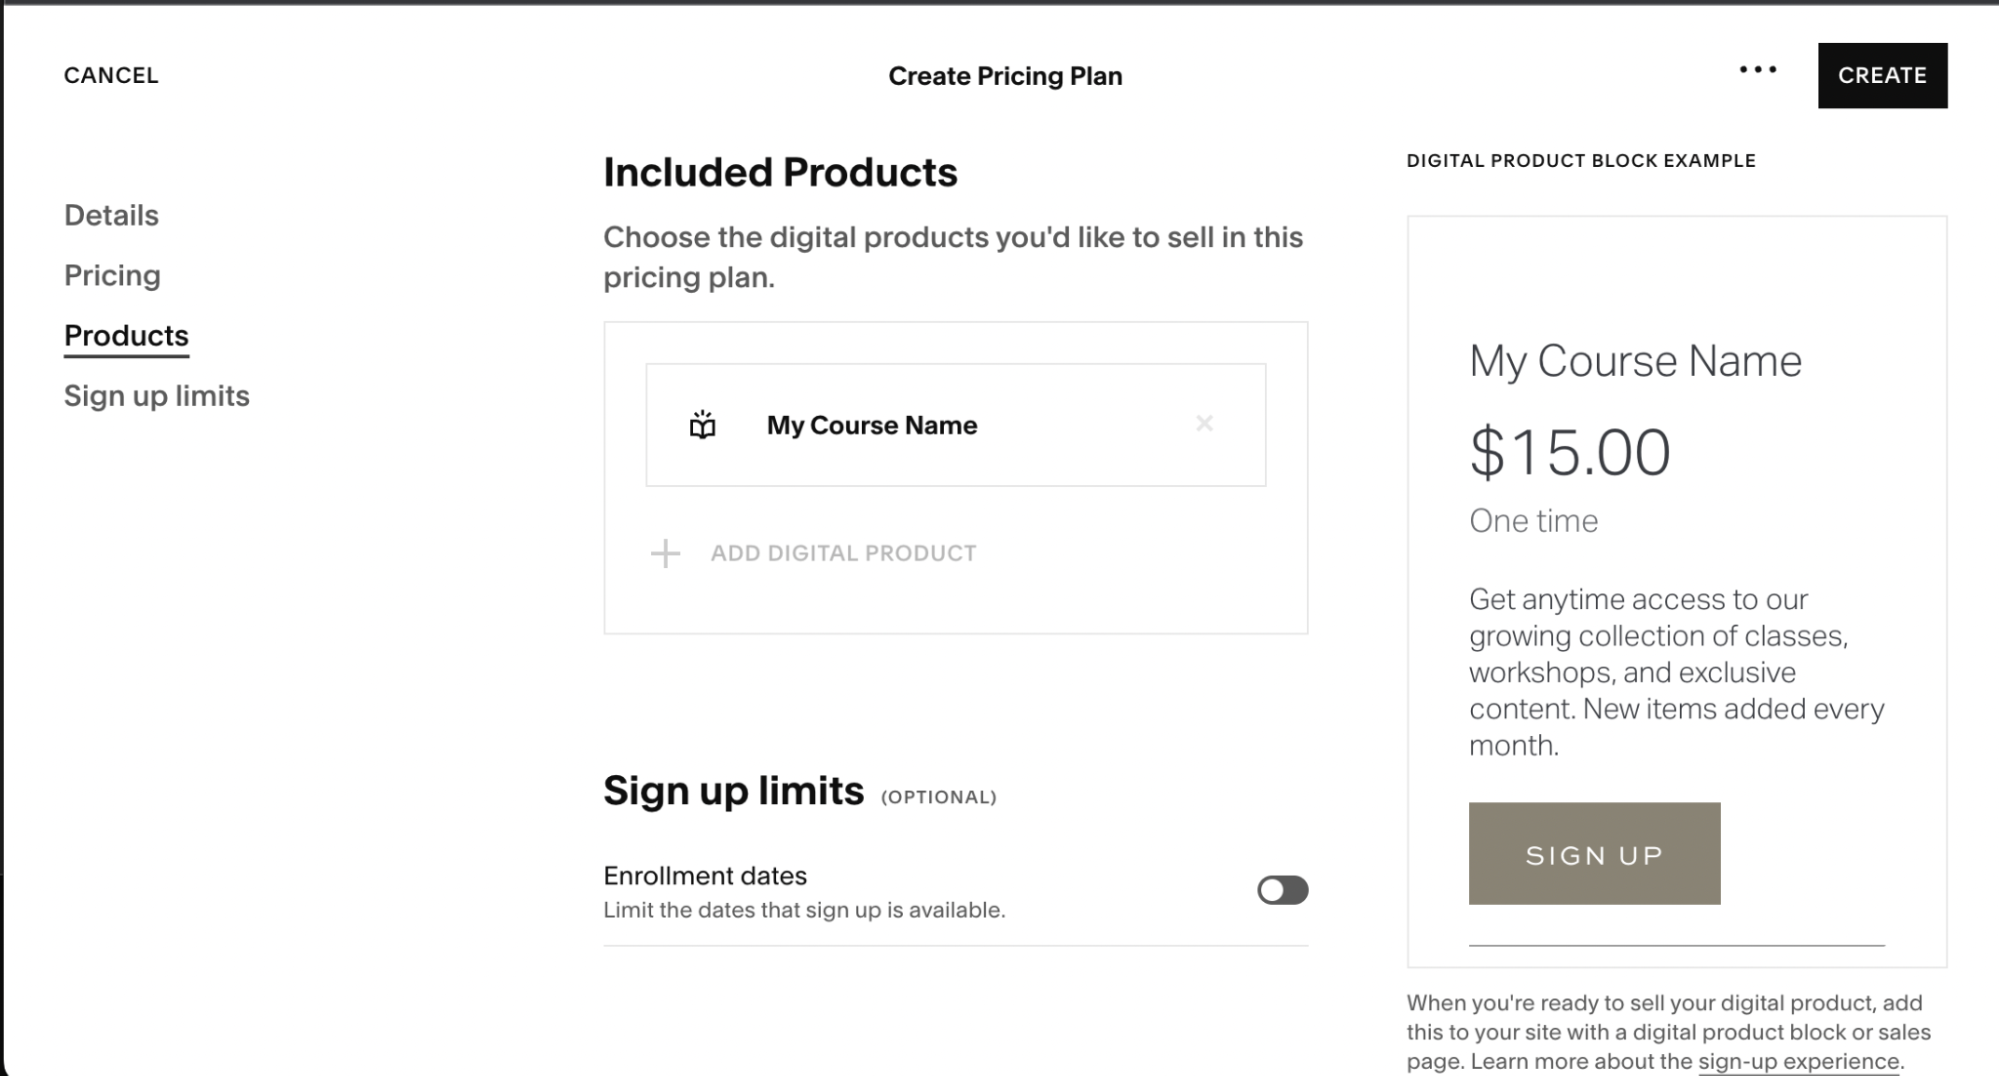
3. Click “Add products” if you’d like to offer more than one course or digital product, for example, in a bundle package.
4. As a course creator, you also have the option to create “Sign up limits”—or a specified window of time when your students can purchase your course. Indeed, a sign-up limit can be helpful to drive up the scarcity and excitement of a digital product. For example, if you're a healthcare professional who is launching a “How To Heal Your Gut” course, you can select a course enrollment period of only three months to gain access to your one-of-a-kind knowledge.
Thankfully, Squarespace Courses makes it quite easy to navigate this portion of your digital journey. It offers several options to create pricing tiers, recurring scheduled payments, the option of a one-time fee, or exclusive paywall content. So, don’t rush this section of your course setup, and allow time to reflect on how you want to price it.
Heads up: When you assign a course page to a resulting pricing plan, it automatically hides the content of your page behind a paywall. This feature protects your content from being viewed by anyone who has access to your course but who hasn’t signed up for every part yet. If you want to update this page, click “Paywall” and alter the information and digital products so your students have access.
How to Set up a Sales Page for Your Squarespace Course
So you’ve built your course, but now how do you get people to buy it? Announcing it on social media and email only goes so far. The next thing you’ll need to do is create a sales page to promote it. A sales page will showcase your product, its benefits, and create the emotional triggers needed to connect with the people who really need it.
I highly recommend hiring a copywriter to write your sales page copy for you. But once you’ve built your sales page, you can add your Digital Product pricing block by following the steps below:
Navigate to the spot on your sales page where you want your pricing blocks to go.
Click “Edit” to enter the Page Editor and then “Add Block.”
Select “Digital Product” block. Be sure to choose the correct pricing plan for your Course, and, as discussed above, it will populate what you created.
3. In the Design tab of the Digital Product block, you’ll have the option to turn off or on a variety of text and change the alignment to customize exactly how you’d like it to look on your sales page.
How to Set up a Payment Processor to Sell Your Squarespace Course
After everything we’ve discussed thus far, it’s time to activate your product and accept payments by connecting to a payment processor. To add yours, click on settings, commerce, and store payments. You can either choose Stripe or PayPal to start receiving cash flow. Now, this choice depends on your location, the payment methods you wish to offer, and, of course, your budget.
How Much Does It Cost to Host a Squarespace Course?
Now that we’ve covered the benefits of creating a Squarespace course, how to build one, and make it on brand, let’s discuss the costs. Remember, you need to have the newest 7.1 version to be qualified to buy the course. After you have an existing Squarespace plan, you can purchase the Digital Products Add-On.
These add-ons range from $0 - $119 a month, depending on your existing plan. For example, if you already have the Squarespace Business plan, you can create a course for FREE. However, you're only allotted 30 minutes of natively-hosted Squarespace videos per lesson, which leads us to our next point. The main difference between the Digital Product Add-Ons and their prices is the amount of video storage and transaction fees.
As you see below, the Starter plan ($9 a month) includes 10 hours of video storage. But, the video storage only applies to videos natively hosted on Squarespace. Indeed, if you host your videos on Vimeo or YouTube and just link to them, you don’t have any limitations. Secondly, continuing to use the Starter plan as an example, there is a 7% transaction fee. So every time someone buys your course, Squarespace will receive 7% of your course price. That may seem scary to hear at first, but it saves you time and costs to have everything operating within one platform.
To avoid the transaction fee altogether, you can upgrade to the Professional Digital Product Add-On for +$119 a month. This plan also comes with unlimited video storage. This plan is comparable to similar plans with Kajabi and Teachable, so the price seems more reasonable when seen in this light.
One strategy might be to begin with the Starter plan and pay the 7% transaction fee (which may not amount to much if you’re only making a couple of sales per month). Then switch to the Professional plan when your sales are more consistent.
So, depending on your budget and course plan, browse the Squarespace course pricing page and reflect on which aligns best with your vision, budget, and current Squarespace membership.
Are You Ready to Create Your First Squarespace Course?
There you have it! Your step-by-step guide to creating your first Squarespace course. The launch of Squarespace Courses & Digital Products has ushered in a new era for entrepreneurs.
With the power to effortlessly create and offer digital products under one roof, it's a game-changer that will empower how you connect with your audience and run your business.
Even more, its user-friendly approach that rivals industry-standard platforms will help you achieve your goals without overwhelming you in the process.
Now, armed with knowledge and know-how, you're ready to take the plunge into the world of Squarespace Courses. Whether you want to share your expertise, generate passive income, or enhance your online presence, Squarespace Courses & Digital Products is your secret weapon for elevating your business. It's time to exercise these skills on how to sell your digital products on Squarespace courses, share your gifts, reach a wider audience, and achieve the abundance and success you were meant for.
However, if this process still feels overwhelming and you want a head start on your Squarespace website or course, check out our line of boutique website templates. We love helping entrepreneurs like you connect with their audience and make their brand known.


